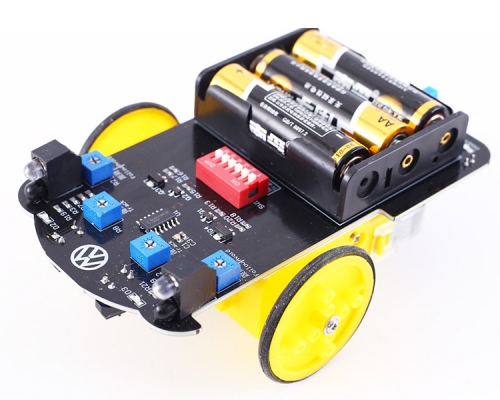
D2-8 Intelligent Tracking Line Smart Car DIY Kits, Fun STEM Kits for School Students Electronic Soldering Learning Practice Kits
| Quantity | 5+ | 10+ |
| Price | $6.65 | $6.50 |
Product Details
1.Description:
It is a D2-8 Intelligent Tracking Line Smart Car Soldering Electronic Parts Practice Soldering Learning Electronics Kit.
Please note: Batteries appeared in picture are not included. PCB color was different in different batch, hope for your understanding.
2.Parameter:
1>.Product name: D2-8 intelligent tracking car kit
2>.Work Voltage: DC 3-4.5V
3>.Work Temperature: -25℃~85℃
4>.Work Humidity: 5%~95%RH
6>.Size: 74*106mm
7>.Product function: Through the NAND 74SL00 chip, it can follow the black track and identify the direction
3.Assembly instructions:
1>.Circuit assembly
1.1>.According to the circuit diagram and the identifier on the circuit board, the color ring resistor, 14 pin IC base, switch, potentiometer and three pole,Tube, electrolytic capacitor φ The 3.0 red emitting diode is soldered onto the circuit board, and be careful not to solder the IC socket in the wrong direction. In addition, for the convenience of debugging, the chip will not be installed temporarily;
1.2>.Paste and install the battery box on the circuit board according to the marked and identifier positions, paying attention to the power pad. Do not solder the polarity backwards, usually the red wire is the positive pole of the power supply;
1.3>.Place the front of the circuit board upwards and thread the universal wheel screw into the hole. And screw in the universal wheel nut and tighten the universal wheel;
1.4>.Place the bottom of the circuit board facing upwards and follow the markings on the board to φ 3.0 Infrared light-emitting diode and infrared receiving tube welded to the board. On the other hand, it is required that the infrared light-emitting diode, receiver tube, and screw are parallel to each other and about 5mm away from the spherical surface of the universal wheel;
1.5>.Install 3 AA batteries into the battery box, turn on the switch, and the LED should light up. If it does not light up, you may φ The positive and negative electrodes of the 3.0 light-emitting diode are reversed. At this time, please switch the polarity. After successful debugging, the self-locking switch will be popped up and the power will be cut off for use.
2>.Mechanical component assembly
2.1>.Place the silicone tire on the wheel;
2.2>.Secure the wheel to the gearbox shaft with hub screws;
2.3>.Divide the connecting wires into two sections and solder them onto each of the two reduction motors for future use;
2.4>.Paste the motor onto the circuit board according to the identifier on the circuit board;
2.5>.Weld the leads on the motor onto the motor board according to the identifier.
3>.Vehicle debugging
3.1>.Test the drive circuit, press the self-locking switch to power on, and connect the 6th, 3rd, and 14th pins of the 14 pin IC socket. At this point, the deceleration motor should rotate towards the front, otherwise the corresponding motor's lead position can be replaced. If the motor does not rotate, please check if the transistor is soldered backwards and if the base resistance value is correct;
3.2>.After powering off, insert the 74HC00 chip into the 14 pin IC base. After powering on, adjust the corresponding potentiometer so that the car can walk normally on the black line without running out of the range of the black line.
![]()
![]()
You Might Also Like
-
 DIY Kit RDA5807 FM Radio Receiver 87MHz-108MHz
$11.89$16.99


